| 일 | 월 | 화 | 수 | 목 | 금 | 토 |
|---|---|---|---|---|---|---|
| 1 | 2 | 3 | 4 | 5 | 6 | 7 |
| 8 | 9 | 10 | 11 | 12 | 13 | 14 |
| 15 | 16 | 17 | 18 | 19 | 20 | 21 |
| 22 | 23 | 24 | 25 | 26 | 27 | 28 |
Tags
- 쿠키런킹덤공략
- 크리스마스
- 자바스크립트
- 자바
- JavaScript
- 쿠킹덤
- programmers
- 쿠키런킹덤
- react
- 쿠키런킹덤크리스마스
- MySQL
- dart
- Eclipse
- 개발자
- 홀리데이익스프레스
- SQL
- edwith
- 티스토리챌린지
- HTML
- Spring
- 프로그래머스
- 유니티
- Java
- 웹개발
- Unity
- 오블완
- MERN
- 이클립스
- oracle
- 딥러닝
Archives
- Today
- Total
Dev study and Repost
유니티6 챌린지 게임만들기05- Unity 6 플레이어 점프 Player Jump 본문
Building & Learning/Unity 6 Challenge
유니티6 챌린지 게임만들기05- Unity 6 플레이어 점프 Player Jump
devlunch4 2025. 1. 22. 23:35반응형
유니티6 챌린지 게임만들기05- Unity 6 플레이어 점프 Player Jump - Unity 6 Challenge Start
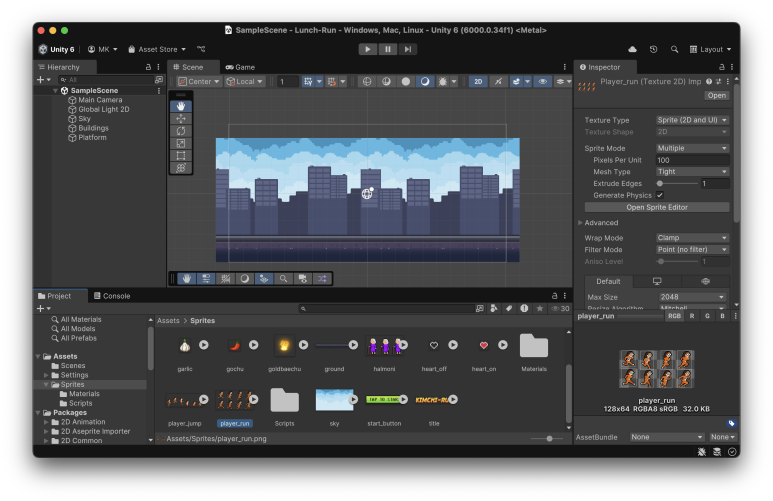
배경화면과 스크롤 설정이 되었고, 플레이어 설정을 시작하게 됩니다.

Asset에 있는 플레이어 이미지를 확인합니다. (player_run.png 파일)
애니메이션 이미지를 위치하고 컴포넌트 설정을 해줍니다.


Rigidbody 2D 컴포넌트 설정을 통해 물리적용을 할수 있게 됩니다.
추가로 Box collider 2D도 추가해줍니다.
이후 코드 작업을 통해 플레이어에게 점프와 상세 속성 값들을 조절하게 됩니다.

Players.cs 파일에 여러 소스코드를 작성하게 됩니다.
특히 스페이스 바를 누를떄마다 점프를 하게되고, 여러 객체와 연동되어 기능구현을 하게됩니다.

특히 `Collision2D`는 2D 물리 충돌 이벤트에 대한 정보를 담고 있는 클래스입니다. 충돌한 객체들 간의 접촉 지점, 상대 속도, 충돌한 객체의 Collider 등을 확인할 수 있어 물리적 반응을 처리할 때 사용됩니다.
*참고링크 :
https://docs.unity3d.com/6000.0/Documentation/ScriptReference/MonoBehaviour.OnCollisionEnter2D.html
* Players.cs 소스코드
using UnityEngine;

public class Player : MonoBehaviour
{

    [Header("Settings")]
    public float JumpForce;

    [Header("References")]
    public Rigidbody2D PlayerRigidbody;

    private bool isGrounded = true;

    // Start is called once before the first execution of Update after the MonoBehaviour is created
    void Start()
    {

    }

    // Update is called once per frame
    void Update()
    {
        // Jump when space is pressed
        if (Input.GetKeyDown(KeyCode.Space) && isGrounded)
        {
            PlayerRigidbody.AddForceY(JumpForce, ForceMode2D.Impulse);
            isGrounded = false;
        }
    }

    void OnCollisionEnter2D(Collision2D collision)
    {
        // Check if the player is grounded
        if (collision.gameObject.name == "Platform")
        {
            isGrounded = true;
        }
    }
}
다음 글에서는 점프시 애니메이션을 추가하게 됩니다.
끝!

반응형
'Building & Learning > Unity 6 Challenge' 카테고리의 다른 글
| 유니티6 챌린지 게임만들기07- Unity 6 장애물 1 Obstacles pt.1 (0) | 2025.01.22 |
|---|---|
| 유니티6 챌린지 게임만들기06- Unity 6 애니메이션 Animation (0) | 2025.01.22 |
| 유니티6 챌린지 게임만들기04- Unity 6 스크롤링 스크립트 Scrolling Script (0) | 2025.01.22 |
| 유니티6 챌린지 게임만들기03- Unity 6 배경 Backgrounds (0) | 2025.01.22 |
| 유니티6 챌린지 게임만들기02- Unity 6 설정 setup (0) | 2025.01.22 |
Comments


